
Follow Me On Social Media!

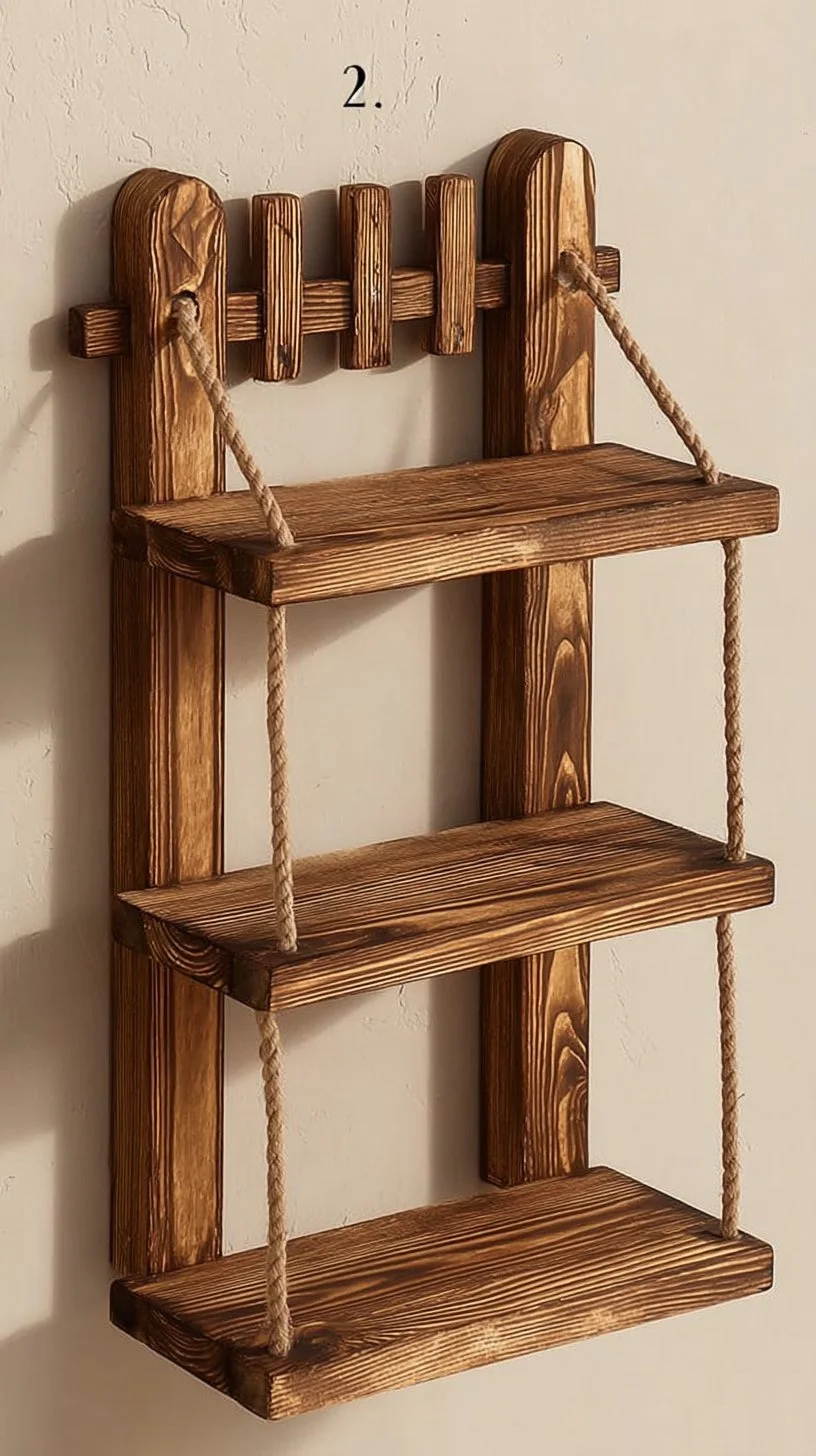
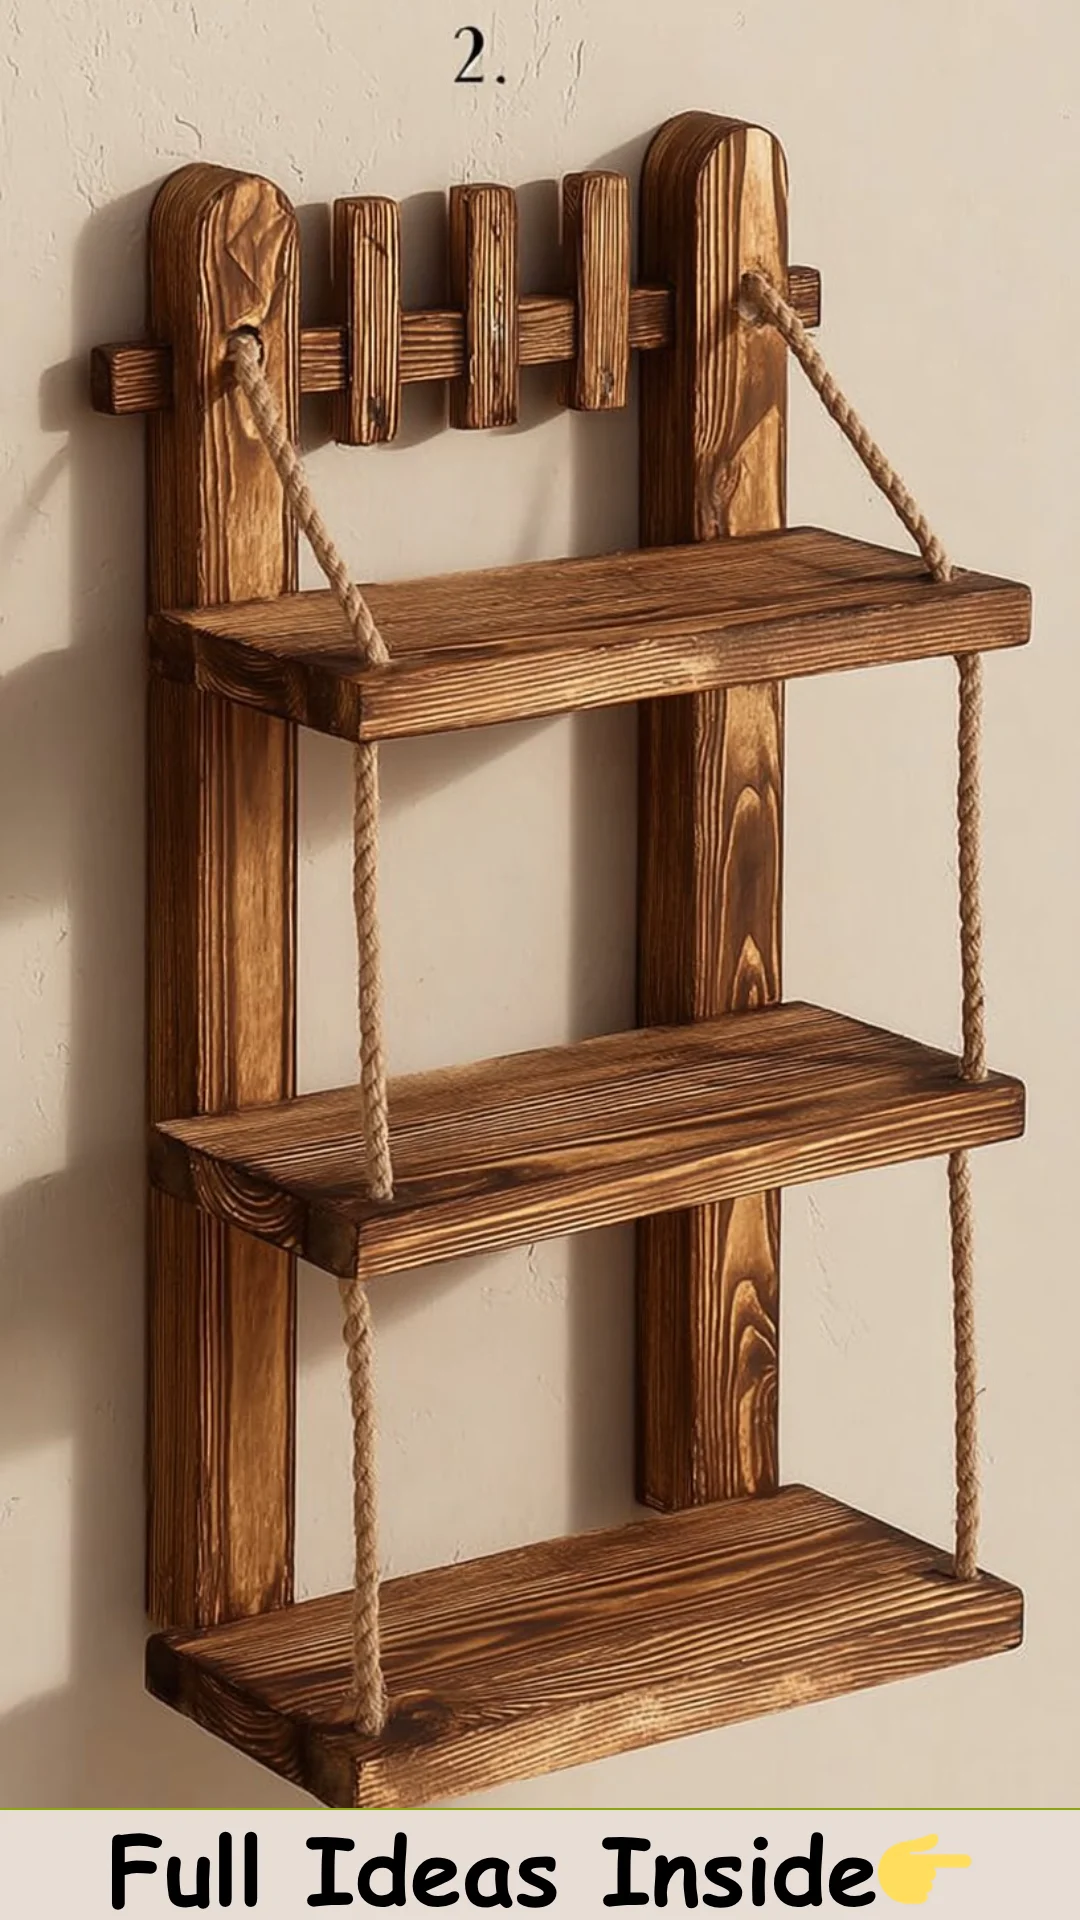
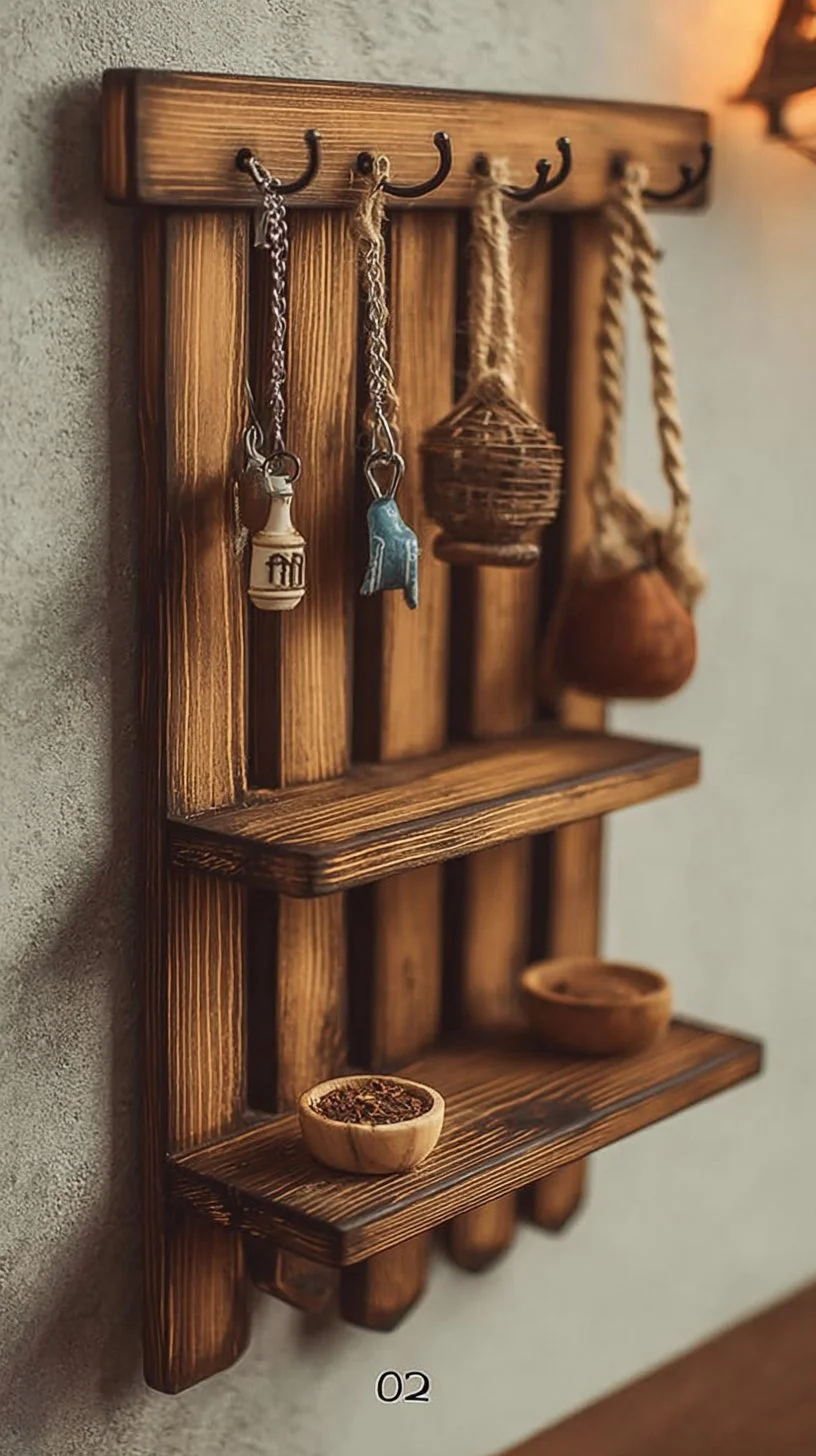
Handmade Wooden Key Holder With Shelf and Decorative Door Hanging
Handmade Wooden Key Holder With Shelf and Decorative Door Hanging
Handmade wooden key holder with shelf and decorative door hanging brings not just functionality into your home but also an aesthetic appeal that enhances your interior decor. Imagine walking into your entryway, greeted by a beautifully crafted piece that keeps your keys organized while reflecting your personal style. Whether you’re looking to reduce clutter or searching for that perfect decorative accent, a key holder with additional shelf space can serve both purposes admirably.
What Makes This Recipe Stand Out
Crafting a handmade wooden key holder with a shelf is an enriching and satisfying process. Not only do you end up with a piece that’s functional, but you also create something uniquely yours, infused with your personality and craftsmanship. The emotional connection formed during the creation process often translates into a more meaningful home accessory. Furthermore, it enables you to pay homage to timeless woodworking techniques while putting your spin on modern design.
Besides its emotional merits, the practical benefits are undeniable. A key holder helps you never misplace your keys again, meaning no more frantic morning searches. This project marries aesthetics with utility, as it can dazzle guests while also serving a very real function. In addition, adding a shelf invites endless possibilities; you can display small houseplants, photographs, or decorative items.
This recipe transcends mere functionality; it’s about creating an ambiance, crafting a lifestyle, and building memories that connect you to your living space. In short, this wooden key holder is more than just a place for your keys. It can be a conversation starter, a decor piece, and a lasting memory.
Ingredient Breakdown
- Quality wood (such as pine, oak, or cedar)
- Wood glue
- Sandpaper (various grits)
- Wood finish or stain
- Hooks for keys
- Screws
- Wall anchors
- A shelf board
- Appropriate tools (saw, drill, measuring tape, level)
To bring your vision of a handmade wooden key holder with a shelf and decorative door hanging to life, the ingredients you need are essential and varied. First, the choice of wood is crucial; solid woods like pine, oak, or cedar not only offer sturdiness but also give a natural beauty that can be enhanced with stain or finish. Each wood type has its unique grain, lending a personalized touch to your project. You’ll also require wood glue to adhere various parts securely, ensuring longevity and durability.
Next, sandpaper is necessary for achieving a smooth finish. Different grits will allow you to shape your wooden pieces effectively, eliminating any rough spots that could detract from the overall aesthetics. Whether you prefer a natural look or want to apply a wood finish or stain, these substances bring out the wood’s natural beauty, protecting it while adding another layer of artistry.
Moreover, don’t forget hooks for your keys, as they will hold the essential item in place. Screws and wall anchors ensure that your masterpiece stays firmly attached to your wall. Finally, appropriate tools like a saw, drill, measuring tape, and level are indispensable for achieving precise cuts and placements. Below is a table summarizing the critical components and their roles:
| Ingredient | Purpose |
|———————-|——————————————-|
| Quality Wood | The base of your key holder |
| Wood Glue | To securely bond various pieces |
| Sandpaper | For smoothing surfaces |
| Wood Finish or Stain | To protect and enhance the wood’s beauty |
| Hooks for Keys | To hang and organize keys |
| Screws & Wall Anchors| To securely mount on the wall |
| Tools | To facilitate the construction process |
Step-by-Step Preparation for Handmade Wooden Key Holder With Shelf and Decorative Door Hanging
Step One
Start with selecting your wood. Quality wood forms the backbone of your key holder and shelf. Measure the wall space where you plan to hang the holder. This will help you determine how wide and tall your finished product will be. Next, with a saw, cut the wood into the necessary dimensions for your key holder and shelf. Typical dimensions might be around 24 inches wide by 6 inches tall for the holder and about 24 inches wide and 4 inches deep for the shelf. Remember, precise cuts are essential for a clean, polished final product.
Step Two
Once you’ve cut the pieces, it’s time for sanding. Using different grits of sandpaper, begin with a coarser grit to smooth out any rough edges or surfaces. Follow that up with progressively finer grits, which will provide a silky finish. Sand in the direction of the wood grain, and make sure that you remove any dust particles after sanding. This step is crucial as it significantly impacts the overall aesthetic and feel of the finished key holder.
Step Three
Next, apply the wood finish or stain. This step will enhance the wood grain while offering protection from everyday wear and tear. Use a brush or cloth to apply the finish, and allow adequate drying time as indicated on the product. If preferred, feel free to apply multiple coats for a deeper color or sheen. Don’t rush this process; allowing ample drying time will yield the best results.
Step Four
Finally, it’s time to assemble your key holder. Take your wood glue and attach the shelf to the top of the key holder. Use levels and clamps to ensure it’s aligned correctly. After the glue dries, drill in your hooks. Spacing is essential here; typically, two or three hooks should suffice, spaced evenly. Once everything is dry and secure, use screws and wall anchors to mount the key holder to your wall, ensuring an unyielding and safe installation.
Full Cooking Directions
Once all components are prepared, you embark on making this handmade wooden key holder a reality. First, ensure you’ve gathered all your materials in one place to streamline your process. Begin by measuring the intended wall space carefully, as this will set the stage for everything that comes next. Using a miter saw or circular saw, make cuts for the base piece that will hold your keys and the shelf above. Aim for precision, as this will prevent issues during the assembly phase.
After cutting the pieces, the next step involves the essential work of sanding. Sanding ensures that the rough edges are smoothed down, which is vital for both aesthetics and safety. Begin with a coarse grit sandpaper and work your way to finer grits. This meticulous process pays off as it enhances the wood’s natural texture and gives your finished product a polished look.
Once satisfied with the smoothness, it’s time to apply the wood finish or stain. This step requires patience, allowing for proper drying time between coats if you decide to enhance the wood deeper. Each application adds character to your piece, showcasing the grain while protecting it from moisture and wear.
With the wooden pieces prepped and beautifully finished, assembling and securing them is the proper next step. Begin by adhering the shelf to the top of your key holder using wood glue. Employ clamps to hold everything in place until the glue sets. After drying, drill the hooks into the base, spacing them evenly for optimal functionality. Finally, securely attach the key holder to your wall using appropriate screws and wall anchors. Test its sturdiness before hanging your keys and any additional decorative items on the shelf.
Pro Tips & Extra Guidance
Creating a handmade wooden key holder is a rewarding experience, but a few tips can enhance your journey. First, take advantage of pre-cut wood pieces available at craft stores if you’re hesitant about cutting your pieces. They often offer a myriad of sizes and styles that can fit perfectly into your vision.
For those seeking customization, consider engraving or painting your key holder. Personal touches make the piece even more special and serve to customize it to your home’s aesthetic.
If you’re concerned about the longevity of your finished piece, applying a sealant can protect it from dust and moisture, especially if placed near an entryway. Also, remember that finishes can alter the color of wood – always test on a small area first.
Finally, don’t shy away from experimenting with different designs. Whether it’s unusual shapes for the shelves or decorative finishes for the hooks, your creativity can yield a distinctive piece that is truly one of a kind.
Best Practices for Storing & Reheating
While a wooden key holder doesn’t require food storage per se, maintaining its look and durability is paramount. After installation, keep it clean by dusting it regularly and using a damp cloth for any stubborn stains. Avoid harsh cleaning fluids that could damage the wood finish.
When attaching items to the hooks, be mindful not to overload them. Exchange lighter items to prevent strain on the hooks and ensure they remain securely fastened over time.
If you ever decide to re-paint or stain your holder after some years, make sure it is completely dry before doing so. Remove any existing finishes with fine-grit sandpaper to ensure the new application adheres meticulously.
Common Questions Answered
How long does it take to make a wooden key holder?
Creating a wooden key holder typically takes four to six hours, depending on your woodworking skills and the finish drying time.
What type of wood is best for making a key holder?
While various wood types can be used, hardwoods like oak or walnut provide durability and richness, making them excellent options. However, softer woods like pine can also be used if you are more budget-conscious.
Is it necessary to stain the wood?
Staining is not necessary; it provides aesthetic appeal and additional protection. If you prefer a natural look, sanding the wood smooth will still yield a lovely finish.
Can I use screws instead of hooks?
Yes, you can use screws for a minimalistic look. Just ensure the screws are long enough to hold the keys securely without falling off.
How can I personalize my key holder?
Engraving your name or a favorite quote is one option. Alternatively, painting it in colors that fit your décor can add a unique touch.
Can I create a larger key holder with more hooks?
Absolutely! Just ensure the base is strong enough to support the added weight from the additional hooks and items you plan to hang.
What finishes work best for outdoor use?
For outdoor key holders, consider a marine-grade sealant, which is designed to withstand moisture and wear better than typical finishes.
Final Thoughts + Call to Action
The handmade wooden key holder with shelf and decorative door hanging brings both practicality and beauty to your home’s entryway. Its creation process allows you to channel your creativity while crafting something unique and personal. This beautiful blend of function and aesthetic will delight you and impress your guests for years. So, get started today on your DIY woodworking journey and create a key holder that encapsulates your style and spirit!